Thursday, November 22, 2012

How I Built my Trench Blocks

I have not been able to game this week, between overtime at work, and Spike and I re-modelling our kitchen. I did find time to put together a quick tutorial for everyone asking about my trench blocks that have been regular scenery on these pages.


Materials needed are several sheets of corrugated cardboard, white PVA glue, sand or flock, latex paint, paper masking tape and hot glue sticks. My tools of choice for this work includes a cutting mat, steel ruler, a square, razor knife, and hot glue gun.


First, cut the cardboard into a lot of squares. Mine  are 3x3 inches. Plain blocks are made my stacking and hot gluing four of them. I try to "cross-hatch' the grain of the cardboard so that warping is less likely.


Here is a hill (6 plain squares, topped by two smaller squares), and several blocks that will make up a river (2 plain squares, topped with two layers, cut to shape).


After the glue is firmly set, I wrap the block in paper masking tape. This seals off the "pores" in the corrugation. Next, paint on a layer of PVA white glue, to seal and strengthen the surface.


After painting the block with a basecoat of latex paint, give it another thin layer of white glue, and dip it in sand or flock.  Allow it to dry, and it will be ready to use.

A few pointers:

Use the framing square to cut your angles sharply.

 Make your cardboard squares  SLIGHTLY under  the desired size. The layers of tape, glue and flock WILL add a little thickness that adds up when you line up eight or twelve of them.

Make sure that your figure bases will fit the channel you cut for your trench. Then double check...some of my original 'one inch' bases were actually 1-1/16, and the dreaded "rebasing evening" resulted.

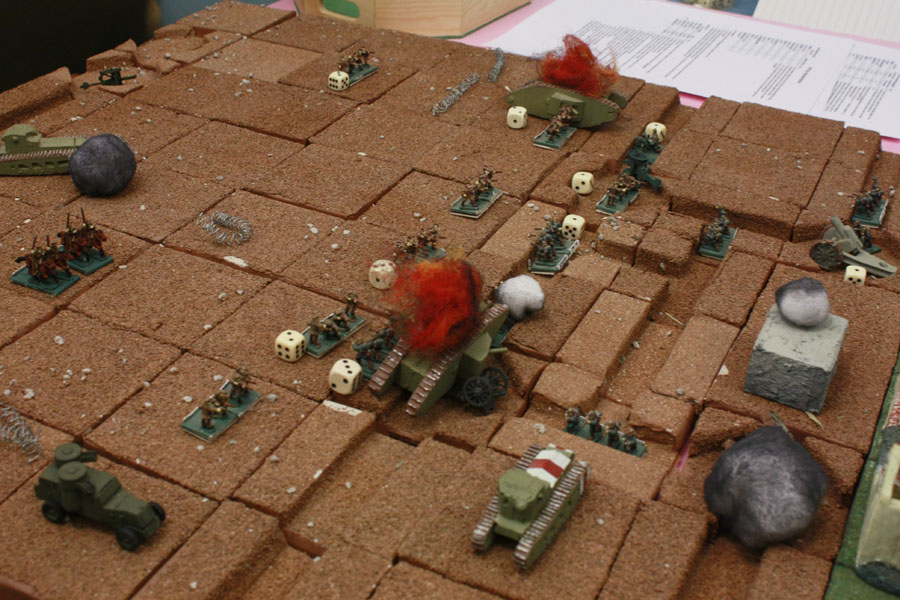
I built a frame to hold an 8x8 block layout. This one was light duty, as an experiment. A piece of light plywood, with sides made of lattice wood, should be all that you need.

NEXT WEEK: Mission Cards for the Trench Raid Game.

Friday, November 16, 2012

Portable Wargaming The Storming of Brentford

I have another blog, dedicated to the English Civil War , Forlorn Hope .
Last night I put up a battle report on trying to recreate the Storming of Brentford, using my adaptation of the Portable Wargame. I found that cavalry did not have the impact that I though it should, so made a couple of modifications. This afternoon, I re-played the scenario, and found the results much more to my expectations.

To summarize, Cavalry and lobsters are now 3 strength points(formerly 2) and both get an additional dice pip to NOT be hit in Close Combat.

I also tried and liked a rule suggested to me by Arthur: Cavalry that has no enemy in movement range, and no one between themselves and the enemy start line, must roll on the hit Results table to check morale.  A roll causing a casualty will compel them to move off the enemy's baseline, looking for the baggage train. They are out of the game, but do not count as Unit;s lost.  A "retreat" result represents the Unit reforming after their charge.

I will post in "Forlorn Hope" every Thursday. I welcome comments and discussion, both of Wargaming and the history of the English Civil War.


Tuesday, November 13, 2012

Night Raid on the Trenches

Caught under a flare!


 Tonight Spike and I tried a few house rules to allow the chaos of a night action in No Man;s Land. I will run through the "scenario rules' here, and later this week post a turn by turn account of  a game using them.

First, no figures begin play on the board. Both sides were given sixteen wooden blocks, marked as such:one Commander, one Engineer, two Machine guns, six infantry, and six blanks. These are deployed, with their labels facing their baseline, like the pieces in Stratego.

The game is played using the standard rules in BBPW. As your side gets to move, roll for initiative, not counting your blank pieces.  The blanks can be moved on your turn, using an initiative point, though they can not fire, and if adjacent to an enemy Unit, they are removed. They are also removed if hit by enemy fire, or " Illuminated" by a flare.

Any "real" Unit may move on its turn. Firing  Units are revealed, and are placed on the board in place of their blocks.

Commanders have a new function; They can fire Flares, using the rules for Mortars. A flare does no damage, but the square it lands in is Illuminated, and any Unit that is in the square or moves through it is revealed and placed on the board. Units firing at a Unit in an Illuminated square receive a plus 1.
Flares stay in the target square for two turns.

Units firing at an unrevealed block DO NOT get a plus 1 bonus for not moving.


A pair of sample blocks on the table

The mechanics worked well to reflect the tendency to "fire at nothing"  or be pinned by a parachute flare.  What is missing, at this point, is a purpose for leaving the safety of your trench.  Over the next day or two,I plan to produce a set of six "Mission Cards" allowing slight variances in the force composition, and a Victory Goal for the individual player.  Both sides COULD be out trying to take a prisoner, by winning a close combat. One Could be trying to remove wire, while the other is trying to lay more.....You get the idea!  Once these are done, Spike and I will play one and give a turn by turn account with pictures.

I will also post an English Civil War battle report on Thursday.
-Steve

Wednesday, November 7, 2012

Trench Assault 1917:The Tanks

A year later the lines have changed but little.  it was time to use different methods. This time the attack would have support from Mk IV tanks, and the breakthrough would be built around Whippets , armored cars and cavalry.


The lumbering behemoths proved their worth immediately, crushing wire so that the infantry could move on.


German 77mm guns did some damage to the tanks, but they had allowed the infantry to pass through. Their 6-pounders kept the German machine gunners off balance as well.


The left-hand tank assaults an entrenched artillery position. The British losses are far less than anticipated.


The right hand tank is hit again, but overruns a German Maxim Gun, then turns left, and advances along the trench line...


...destroying a 77mm gun. The German front is in peril.


However, a bold unit of Jagers assaults the flank of the Mk IV with stick grenades, finally stopping its foray. on the left flank, the other tank falls to the machine, gunners.


While the Germans have been moving to stop the Mk IV's, the British infantry has turned the German right flank. The Whippets and armored cars are on the move.


Crossing the first trench, the lead Whippet pours machine-gun fire into German positions. Cavalry begins to follow the light tanks.


Relentless pressure is applied to the German right flank. Slowly, the Austin Armored Car crosses the first trench line.


The "arme blanche" await their mechanized partners.


Finally! The lead Whippet breaks through the German second line. Cavalry helps to scatter the survivors. The Austin and remaining Whippet move forward.


As the German line crumbles, the light forces move up the road toward the German rear areas.  There would be no talk of  "dig in and hold" today!


Watching for a counter-attack that did not come.....


A salute to the brave men who pioneered the use of tanks and armored vehicles!


A FEW MORE GAME NOTES:

The Armored car is a Peter Pig model.
The Whippets and Mk IV's were hand-carved and cast in resin several years ago.
I found the rules for Close Combat worked very well for the chaos of a trench assault. The side that
   has the last fresh reserves available will probably win the day.
I hope you enjoyed this one Arthur!

NEXT WEEK: A Night Raider Variant for WW1.

Draft Version of Portable Wargame: English Civil War

Here is a draft version of my English Civil War adaptation of Bob Cordery's Portable Wargame . I am playing on a grid of 11x11 squares.  I welcome any comments and questions. I hope to post a battle report using the rules this week.

Here is the link to the rules:
 
 Portable Wargames ECW rules pdf at Google Drive

Tuesday, November 6, 2012

The Trench Assault-1916

"This time it will work. We will smash our way through the thin German line, pass through the village, and get our cavalry in to the green fields beyond...." At least, that was the British plan.

This week's battle report features a British force of  8 Units of infantry, 2 Machine gun Units,  4 field artillery Units, and 2 units of cavalry.

On the German side were 6 infantry units, 2 machine guns, 2 field guns, 2 heavy guns, and a command unit in a concrete bunker.


The opening artillery barrage brought a quick response, including an unwelcome one-GAS! The right flank British artillery was disrupted from the start.


The British infantry "jumped off' heroically, moving up to begin the work of removing wire. Their machine gun companies moved up with them to lend support.


The German front line troops used the wire-imposed delay to cut a swath through the assault troops.


Still, the British troops pushed into the first line of trenches, trading lives for real estate. The Germans began to rush reserves in to counter-attack.


A brave Subaltern and his lads hold their just-won trench.


Casualties begin to mount. A contest of flanking attacks begins in the center. Who will be left holding the line?


Sensing a breakthrough, the British commander begins to deploy his cavalry.


Still, the German jagers hold their ground.


British troops begin to waver under the counter-attack. As they break off from assaults, German fire begins to inflict heavy loses.


The Germans hold the line....for now.


"Next time we will get them".  Maybe those landships will help....


TOMORROW NIGHT; Be here as we move the calender ahead one year to see the British attack the same section of line with the support of tanks and armored cars.

SOME GAME NOTES:
 All of the figures are Peter Pig, except the German Heavy Guns, which are hand carved.
The building ruins are from Old Glory.
The "trench blocks" are 3x3 squares of cardboard, wrapped in paper tape, painted and flocked with
"earth" and cat litter .
Barbed wire is made from thin picture hanging wire, braided and coiled around a dowel.
The game took less than an hour. The outcome was in the balance until the minute the British broke.
Spike took all of the pictures.

Friday, November 2, 2012

A Mid-Week Update

Just a quick update, based on some questions and comments received so far.

Next Tuesday, look for a battle report on two World War One trench assaults: one without tank support, the other aided by a couple of Mk IV's and Whippets.  The will be some closeup shots of my modular trench blocks, seen in the header picture.

I have made some notes and solo tested my English Civil War adaptation of the Portable Wargame, based on  a merger of Joe Morschauser's "shock" and "musket" rules. Troop types are Pikes, Muskets, Ill-armed foot, Dragoons, Cavalry and Lobsters. Artillery includes Culverins, Sakers, and Falconets.
I am using units strengths of two or three for most units, and one for artillery. I hope to have the rules formatted in the same manner as Bob Cordery's Portable Wargame; Modern by next week. I will then post them for your perusal.

Last night I played a quick re-fight of the Battle of Hastings using Morschauser's "shock" rules, with only a couple of tweaks. there were twelve units per side. Melee infantry had three strength points, Cavalry and missile infantry had two. The Normans reduced the Saxons to  50% of original strength after six turns. I feel very confidant that Portable Ancients will work well with just a little work. Thanks to Carles for suggesting this direction to me.

Thanks for reading and commenting,
-Steve